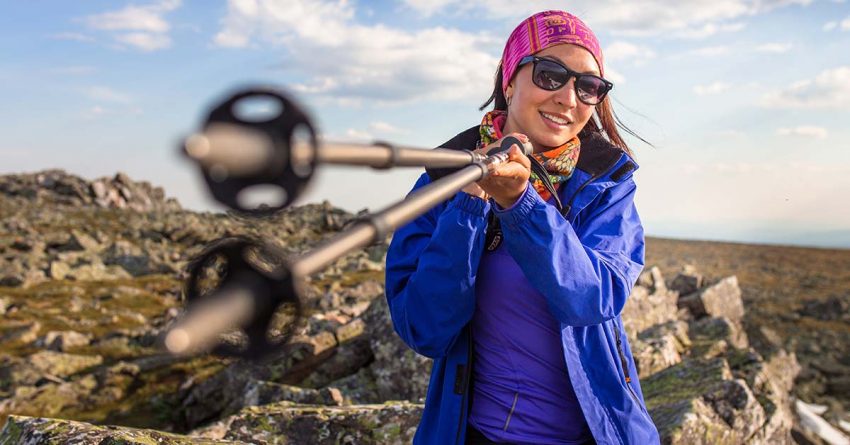
If you are new to hiking you may be caught off guard seeing someone who appears to be using ski poles as they walk along a hiking trail. Are these avid cross country skiers that use their poles everywhere? What are hiking sticks?
Hiking poles or trekking poles are used by hikers to provide balance, stability and support. These walking poles usually have a handle with a strap, a collapsible shaft and a tip. They are used in much the same fashion as a skier would use ski poles but trekking poles are built specifically for hiking.
So what is going on here?
As a kid when you went for a walk in the woods you probably, at some point, picked up a long stick and used it as a walking stick. That walking stick probably came in handy when walking on uneven or rough terrain. It may have helped pin down a snake or help hold up a tent. You likely used it to leverage yourself up steep terrain. I would use my hiking staff to pole vault over small bodies of water. (Very small bodies of water – think puddle here.) The versatility of that walking stick was not lost on you as a kid. If you were like me, you would want to keep that stick. Who else here as taped the end of their stick to create a crude handle? And painted it with whatever color paint was left over from the most recent room renovation in the house?
Hiking poles, or “trekking poles”, provide this same versatility with comfort, durability and style in mind. And you get to bring them in the house! These tools of the trail have come a long way from the dead crooked stick we relied on as kids. So, what goes into these hiking poles?
Let’s break down the poles.
This bit of hiking gear is nothing if not intuitive. No instructions required to get started with these bad boys. So if you were to pick up a pair of walking sticks… you would naturally grab it by the handle. We’ll start here. Starting from the top of the pole we will work our way down to the very tip of the pole.
Each piece can come in different materials which will affect the overall weight, durability and price. As with almost everything you purchase buying the right trekking poles is all about understanding what is the key factor is in driving the decision. Price, Weight and Durability are some of the most common factors. Other secondary factors include length, foldability and color. More on that in a bit… let’s jump into our trekking pole anatomy.
Let’s start at the top
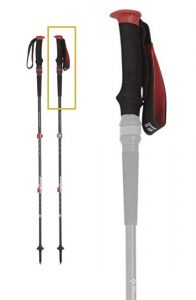
If you are standing and holding the pole your hand is holding the Grip. The grip is commonly made of foam, rubber or cork. Each of these materials have their pros and cons and the best material will be dependent on what sort of conditions they are facing.
Rubber handles have the least amount of give but are waterproof. Rubber handles are the best choice for cold and/or wet weather hiking. Although the rubber handles are the least comfortable they do provide the greatest durability.
Foam grips are the lightest and provide a better grip then the rubber handles. The foam handles will take on some water in wet conditions and get a bit slippery.
Cork grips will mold to the shape of your hands over time providing the most comfortable fit. Breaking in a pair of cork handles results in super light and comfortable uniquely fitting poles. Cork is a soft wood that does expand and get heavier and slippery when wet. At the end of the day the comfort provided by cork outweighs the durability and wet weather performance. We recommend going with cork for your hiking pole handles.
Attached to the handle are wrist straps that are used to fasten the pole securely to the hands of the hiker. These straps are all typically made of high quality nylon. One thing to consider when looking at the strap is the adjustability. Some trekking poles have adjustable straps that allow you to cinch in the poles to your hands tightly and securely. Having a secure hold of the trekking poles is important when slipping and falling are concerns. You want to be able to rely on the pole at any moment and not have to get a good hold of it first.
The shock absorber
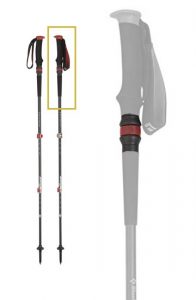
As we work our way down the pole just beneath the grip some trekking poles have shock absorbers. Not every trekking pole has shock absorbers. The purpose of these little bits of technology is to bring an additional cushion to the hiking experience. The anti shock will probably serve you better on some trails more than others. Poles with the shock absorbers tend to feel less sturdy, especially if you are going through uneven terrain and using the poles for balance.
Many of the poles that provide shock absorbers also provide a way to turn them “off”. Having the option is better in our opinion then always having them absorbing the shock. If hiking well worn, flat terrain the shock absorbers may provide a more comfortable experience.
The shaft
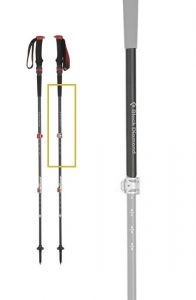
As we travel down the hiking pole our next stop is the shaft. The shaft material used to fabricate these poles is going to contribute significantly to the overall weight, quality and durability of the hiking poles. Shafts are, in most part, made from either aluminum or carbon. As with all other material choices through the poles aluminum and carbon come with benefits and drawbacks.
Aluminum is a bit heavier then carbon but is stronger and usually cheaper.
Carbon, besides providing the lighter material, does provide initial strength in the construction. The problem occurs when the sticks take any sort of direct hit. Aluminum is more forgiving with denting and bending. In these cases, aluminum, can be quickly fixed out on the hike. Carbon shafts do not boast the same durability and tend to snap under a direct hit.
The extenders / hinges.
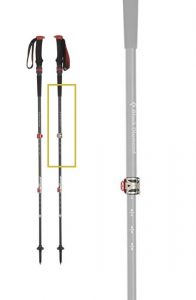
The shaft is not one long piece. Trekking poles have 2 or 3 sections of shafts that are fastened together with extenders or hinges. The purpose of these locking mechanisms is two-fold: 1. To get the right height for the pole. 2: To compress the pole into its smallest packing profile.
There are a few different types of extenders used by trekking poles. The flip and clip (or lever lock action) provides some sort of a handle that applies friction and force to clamp down the pole. Twist locks provide the tension from within the shaft and operate like a tension rod holding a shower curtain. Twist locks are subject to getting dirt and grime buildup with significantly reduce their effectiveness. Because of this twists locks can be less secure compared to their flip and clip counterparts. We recommend going with a lever locking extender on your trekking poles.
The basket and tip
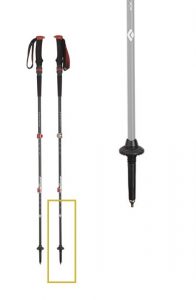
As we approach the bottom of the pole we are met with two very important pieces of the trekking pole puzzle. Directly above the tip is the basket. The basket is the collar above the tip. Which basket you have installed on your poles will be determined by the conditions and activity of the day. If these poles are to be used in the snow then a wider basket with holes will serve you well. However if you are hiking on an overgrown trail you’ll want a smaller basket that won’t get caught and tangled in the growth. Some pole manufacturers provide the ability to interchange the basket providing flexibility. If the basket is stationary it probably best to aim for a middle of the road basket that will work across most terrains.
And rounding out the trekking poles are the tips that interface with the ground. Trekking poles usually come with hard metal or carbide tips. These tips are ideal for tough terrain and will ensure a strong footing. The metal tips can also be replaced with rubber tips. You may consider using rubber tips to improve tracking in slippery conditions. Another time you may want to utilize rubber tips is when hiking along finished trails with pavement or concrete. The rubber tips will protect the surface from scratching while still maintaining solid footing.
Versatility of hiking poles
Besides the obvious hiking advantages trekking poles can also provide additional services along the way. Some popular ways to leverage hiking poles when hiking include:
- A tent support. A trekking pole is an ideal solution to pitching a make shift one person tent.
- A splint. AS the old adage goes: “Hope for the best and plan for the worst”. As part of planning ahead you can look to your hiking poles as excellent splints in the field. They are straight, durable and built to provide support. You will be hard pressed to find a better splint should the need arise.
- Path clearing. Chances are if you are hiking with trekking poles this one comes naturally – but having a couple of poles along for a hike are excellent tools to knock out spider webs, poison ivy, dead animals and other obstacles. When you’d rather not use your hands performing light duty tasks with your poles is super convenient.
- Testing water depth. Don’t let standing water surprise you. Avoid inadvertent soaking wet socks (or worse) by leveraging your poles to ascertain the depth of that puddle. The same is true of snow.
- Communication. When out of earshot from others trekking, poles are used to communicate with others. Common signals to know when using your trekking poles to communicate include: Two poles held out horizontally like a “T” is used to communicate that everything is okay. Holding one straight above your head or waiving back and forth means is used to communicate distress and request immediate assistance.
- Camera monopod.
- Drying rack – Hang wet clothes on your poles to allow them to dry. Additional some string can be used between both poles to create a clothesline.
- A place to rest. A seat can be fashioned by lowering your poles to half height and leaning your backpack against them. By supporting your pack you have a comfortable place to lean back and rest.
So how do you choose?
As we alluded to before choosing the right trekking poles will vary based on which key factors are most important to you. The three biggest factors are cost, weight (comfort) and durability. Would you rather have trekking poles that will last longer but are pricer? Would you rather have poles that are more comfortable? By asking yourself these sort of questions you will be able to quickly identify which of these leading factors has the most weight in your decision.

